Secure shell
This year and last year, I learned a great deal about remote development through remote servers. Working for the Air Force, there was a lot of hardware for our use that had a bunch of GPU’s and CPU cores that proved to be very helpful for expediting training. Luckily for me, I was able to use some of this hardware to do some of my own training. However, all of this required knowledge about Secured Shell (SSH) and RSA keys. In order for me to establish an SSH connection over these remote severs, I had to upload my SSH public key to the remote server so the server could recognize who I was when I tried to establish an SSH connection. But first, what is SSH? SSH is a remote administration protocol that provides strong password authentication and public key authentication, as well as encrypted data communications between two computers connecting over an open network, such as the internet. It provides a mechanism for authenticating a remote user, transferring inputs from the client to the host, and relaying the output back to the client. The secure connection over the internet allowed me to upload my training and testing code to the remote servers and used the 40 CPU cores they had there or the 5 GPUs to incredibly expedite my training.
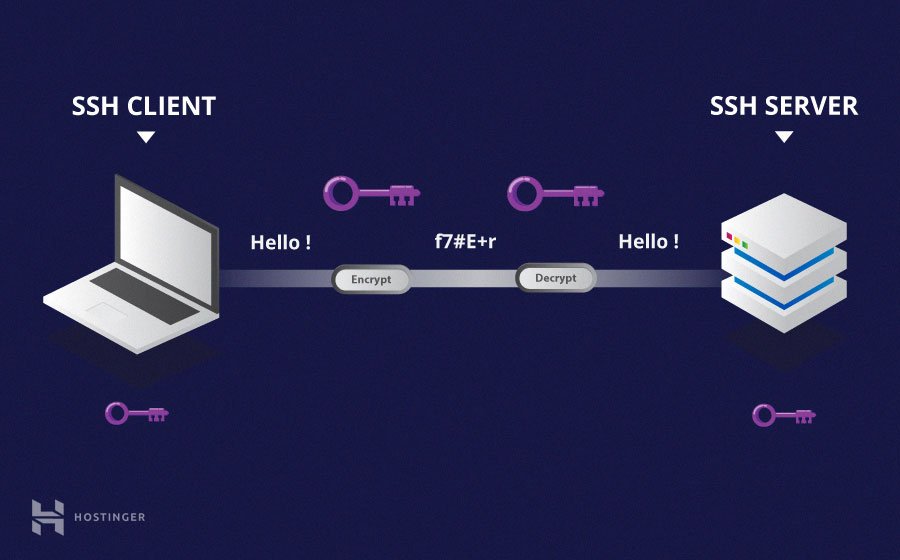
Here’s a visual that has helped with my undertanding of SSH.
An incredibly useful tool for me was rsync, which allowed me to sync my code very efficiently to the remote servers and then if I made changes sync them back to my local machine. Another tool was one of Visual Studio Code’s remote development extension pack that allowed me to directly run code in the IDE on the remote servers and have it output on my local machine. I mainly worked in Pycharm because all of the code I wrote is based in Python, but I specifically used VS Code to run my code on the remote servers so I can have it easily output it my local machine. Plus, Pycharm requires the professional edition if I wanted to do SSH stuff in it. But yeah, SSH is a really amazing protocol developed that has aided me tremendously in doubling the research and work I’ve done.
Public and Private Keys – Good ol’ RSA
Before I could do any SSH-ing though, I had to upload my own personal SSH public key to the remote servers and have it authorized. But first, what is this public key that I keep talking about? If you’re reading this, I’m assuming you have some knowledge of terminal/command prompt commands, but no worries, if you don’t you can skip the technical parts of this as I’ll explain everything conceptually as well. Anywho, each person who uses SSH first needs to generate their own public-private key pair using the terminal command ssh-keygen -t rsa. Once ran, you should get something like this:
Output
Generating public/private rsa key pair.
Enter file in which to save the key (/home/demo/.ssh/id_rsa):
Enter passphrase (empty for no passphrase):
Enter same passphrase again:
Your identification has been saved in /home/demo/.ssh/id_rsa.
Your public key has been saved in /home/demo/.ssh/id_rsa.pub.
The key fingerprint is:
4a:dd:0a:c6:35:4e:3f:ed:27:38:8c:74:44:4d:93:67 demo@a
The key's randomart image is:
+--[ RSA 2048]----+
|          .oo.   |
|         .  o.E  |
|        + .  o   |
|     . = = .     |
|      = S = .    |
|     o + = +     |
|      . o + o .  |
|           . o   |
|                 |
+-----------------+
Once you see that, you’re good to go. Your RSA public/private key is generated and is stored in your .ssh folder. cd into that and do cat id_rsa.pub. There it is, voilà: your very own SSH public key. You can also view your private key, but make sure nobody gets a copy of your private key. In the world of SSH and RSA, your private key is the only proof that you are who you say you are. A general rule of thumb, once you generate your private key, just leave it alone. Don’t go sharing it with your friends on Instagram or blogging it somewhere. The public key is the one you want to pay attention do. Once you have the public key generated, you want to copy it using ssh-copy-id demo@your_remote_servers_ip_address and have whoever is the admins of the remote server authenticate it. Once that’s done, you’re good to go! You’re able to SSH onto the servers now.
To recap/explain what we did, we generated a RSA public/private key pair. These pair of keys will allow remote servers to authenticate your local machine. Once the public key is uploaded and authenticated on the remote server, you can remotely “log on” to the remote machine because once you attempt to SSH onto the remote server, the server will see if your public key and private key match up. If they do, then the connection will be established without the need of any password! It’s very cool and has dramatically increased the security of these remote servers. But that about sums up my experiences with SSH and RSA. I had to go through the same process of generating my RSA keys, uploading them to our remote servers, waiting for them to be authenticated, and finally once authorized, doing remote training and testing through an SSH connection. Hopefully you enjoyed reading about this and didn’t bore you out too much!